
STEM Club support - Primary BRONZE Booklet
The following information is supplementary to your booklets and will help guide you through the delivery of your STEM club. This may include short how-to guides for the different activities or additional resources that you can share directly with your students or use to increase your own knowledge.
![]()
Important Information
These resources are provided by The Schools' Observatory project, which is part of the Astrophysics Research Institute of Liverpool John Moores University. This video introduces The Schools' Observatory Project.
The Liverpool Telescope (LT) is the World's largest fully robotic telescope; your students will learn to use it during this STEM club. More information about the LT, including its design and science capabilities, can be found on our web page: Liverpool Telescope.
We recommend you register for free as a Teacher before the first session you plan to run. Your students must have their own accounts set up so that they can use the Liverpool Telescope during this STEM Club. This detailed video explains how to set up student accounts.
The sessions do not need to be delivered as 6 x 1 hour sessions; you can split up the sessions and activities in the way that works best for you and your students, nor do the sessions need (for the most part) to be done in the order presented. The exception to this is sessions 1 and 2. Session 2 must be done after session 1 is completed. You may want to plan Session 5: "Rocketships" when the weather forecast is favourable.
Some activities involve sticking pictures into the student's booklets, so scissors and glue sticks will be useful to have on hand.
![]()
- Session 1: Join The Schools' Observatory
Activity 1: Go Observing
Request your image of the Moon. For help getting started with registering on the website, logging in and then taking your Moon observations, just follow the steps in this video:
We have produced an information sheet to show your pupils how to log in and request their Moon observation (PDF).
Troubleshooting (why there may be delays in getting your observations)
Given good weather, requested observations of the Moon should be ready by the following STEM club session if they are ‘observable’ during the intervening period. This is shown by the colour bar indicating the ‘chances of observing’ displayed when observations are requested. If their chosen area is not observable due to the phase of the Moon, students may have to wait a little longer until it does become observable. Occasionally, poor weather or technical issues may hamper observations and result in a delay. In such a case, students can use archived images of the Moon for Session 2 until their requested observation(s) can be made (instructions below).
We have a dedicated webpage for further 'Help with Go Observing'.

Activity 2: STEM Club Quiz and Draw an Alien
If you are running out of time, this activity can be completed at home.
Our video explaining the Solar System can provide you with some background knowledge to help your students answer the solar system quiz. The answers are in the leader booklet on page 7.
- Session 2: The Moon
Reminder: If you haven't already done so, go through the answers to the Solar System quiz (page 7 in the leader booklet). You can also ask the children to show their alien pictures to the group and stick them into their booklets.
Activity 1: Viewing your Moon
If any pupils do not have their own Moon images back from the telescope in time for this week’s session, you can download one from our website (see instructions below).
The observations made with our telescope come back as a specific type of file called a fits file. These need to be opened using special software, which we provide for free. We have two versions, AstroLab and LTImage - for the purpose of this STEM club we will mainly use AstroLab. You can learn more about all the tools available in AstroLab by visiting the help pages.
We have produced documents you can show your pupils to open their Moon observations:
When your observations of the Moon are ready, you can follow the steps in this video to easily open, view, scale, and save them as pictures.
Using Images from the Archive
In addition to requesting your own images from the Liverpool Telescope, you can also search through The Schools’ Observatory archives. To do this, select the ‘Archive of Observations’ option from the ‘Go Observing’ submenu on The Schools’ Observatory website. The resulting search form allows you to narrow down the observations to those of particular interest.
For this session, in '...Of Objects with names like this:' type 'Moon' and '...Taken for this Observing Programme:' choose 'The Moon'. Other search fields can be left blank. Then click the “Search the Archive” button at the bottom right of the screen to return a list of images of different moon sections. To view a particular image, click on the 'Code' for that image in the first column of the table, and then click ‘View Image’ to open the image for viewing in AstroLab as described above, or click ‘Download the FITS Image Data File’ at the bottom of the screen in order to view the image using LTImage.
This video takes you through the process of exploring the archive in more detail.
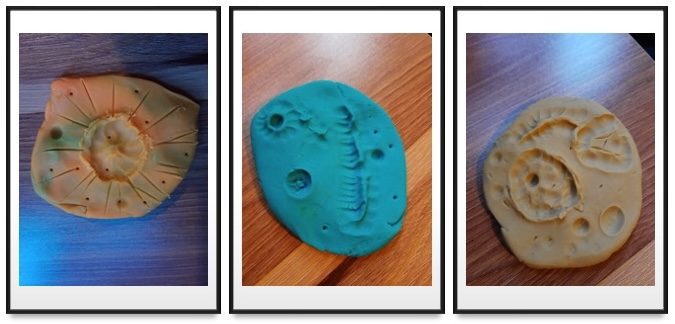
Activity 2: Play-Doh Moons
Play-Doh recipe and Risk Assessment (web link)
The Play-Doh Moons activity (page 8 in the pupil booklet, page 9 in the club leader booklet) really brings the Moon to life. Try to get the children to identify the Moon's high points (crater ridges and mountain ranges) and its low points (valleys, inside craters, and ‘seas’, the large dark areas).
Here are some examples:
Unlike on Earth, scientists cannot use sea level as a reference point to talk about high and low points on the Moon, so they came up with an average lunar level. When we talk about high and low points on the Moon, they are compared to this average level.
Mons Huygens is the Moon's tallest mountain. It is about 5,500 m (18,000 ft) high. In comparison, Snowdon (Yr Wyddfa) in Wales is around 1000 m tall, and Mount Everest is around 8,800 m. Selenean summit is the highest point on the Moon at 10,786 m tall.
The lowest recorded point on the Moon is at the bottom of a small crater within the larger Antoniadi crater. It was measured at over 9 km below the average level. In comparison, on Earth, the Dead Sea (lowest point on land) is 427 m below sea level, and the Mariana Trench is almost 11 km below sea level.
You may like to support this activity by watching our video all about the features that you can see on the Moon:
Remember to take photos of your Moon sections and print them out in time for the next session.
Activity 3: Lunar Diary
We recommend that you make photocopies of the lunar diary for this activity so the children can take them home. This way, the booklets can stay in school and not be forgotten or damaged while at home.
As the weather in the UK is highly unpredictable, you can ask the children to draw clouds, rain, hail, snow, lightning, etc., if they can’t see the Moon. They could also be given a spare photocopy to restart the activity if the weather is bad for a long period of time.
We have a 'Things To Do' page that may help you with this activity; it includes a Moon phase simulator: Why Does Moon Have Phases?
- Session 3: Solar System
Play-Doh recipe and Risk Assessment (web link).
The Solar System activity involves creating a scale model using Play-Doh to highlight the relative sizes of the planets in our Solar System. The students will also require a sheet labelled with the names of the different planets (pencils and paper if they do this themselves) where they can assemble their Play-Doh models, and a ruler/modelling tool or equivalent that they can use to cut the Play-Doh into sections.
It is recommended that the course leader give a brief introduction to the Solar System at the beginning of the session, checking that the participants are happy with the names of the planets and the order in which they are arranged (Mercury, Venus, Earth, Mars, Jupiter, Saturn, Uranus, and Neptune moving outwards from the Sun).
Our video, ‘Science Questions: What is the Solar System?’, provides background information on the Solar System and how the planets were formed.
Details of smaller objects such as asteroids and comets can be found in our video ‘Space Questions: What are asteroids and comets?’.
It is worth highlighting that the Sun is the primary source of heat and light within our Solar System and that temperature decreases with distance from the Sun.
The third video demonstrates the steps outlined in the booklet to make a model of the Solar System:
Depending on the group, the session can be undertaken in pairs or as a small group activity where tasks are shared by the group, who can follow the instructions in the booklet at their own pace. Alternatively, pupils can be talked through the steps one by one as an entire group to help ensure that everyone stays on track.
While this activity illustrates the relative sizes of the planets in our Solar System, a different scale is needed to illustrate their relative distances. The latter can be demonstrated with a Pocket Solar System, which the course leader can show at the end of the session if prepared in advance or undertaken as a separate activity.
To end the session, it's interesting to compare the size of the planets to that of the Sun. Assuming you used 3 small tubs to create your planets, you would need about 1800 tubs of Play-Doh to make a Sun at the same scale!
Remember to remind your students to complete their Lunar Diary from Session 2.
- Session 4: Exoplanets
In this session, the pupils will study planets. They will think about planets that orbit stars outside of our Solar System, known as ‘exoplanets’. You may need to remind the pupils that the Sun is actually a star and that most stars they can see in the sky have planets orbiting them.
Introduction to Exoplanets
Our video 'Science Questions: How Do We Search For Other Planets?' can provide you and/or your pupils with some additional information about exoplanets. The video provides answers to questions your students may have: What is an exoplanet? What types of exoplanets are there? What is the closest exoplanet? Can we visit exoplanets? Why search for exoplanets?
Design a Planet Activity
For this activity, participants are tasked with imagining that they have discovered a new planet outside the Solar System and creating a poster to describe it in some detail, including a drawing/image and a list of its various characteristics, such as its name, size, temperature, surface type, etc. Feel free to offer a few minor hints as the creative process is taking place, but also try to encourage participants to let their imaginations roam free.
The following is an example of what might be expected: Example poster
Play 'Hot, Cold or Just Right!'
Why not end the session by looking back at our own Solar System and working out how many planets are in the Goldilocks zone, the distance from the star where it's just the right temperature to have liquid water? You'll need to print out the temperature scale and planet pictures in advance.
You can find all of the instructions and printouts in our 'Things To Do' activity.
Poster version of the temperature scale (download zip files)
Why not get the students to pin their newly created exoplanets on the same scale?
- Session 5: Rocketships
An Introduction to Rockets
You may want to spend a little time at the start of the session discussing what rockets are and how they are used. Our information pages on rockets may help you with this. Alternatively, some links to useful videos on YouTube are included below to help guide you:
- How Do Rockets Work? 3 mins
- How Do We Launch Things into Space? 3 mins
Modern companies like Space X are also working on making rockets reusable - this makes each rocket launch much cheaper and less wasteful. After the launch, parts of the rockets land back on Earth and are collected, checked, and then used for future missions. Some nice videos of Space X rocket launches with re-landing can be found on the following links:
- Rocket Landing on Drone Ship 2 mins
- Falcon Heavy & Starman 2 mins
- How Not to Launch an Orbital Rocket Booster 2 mins - a compilation of rocket failures!
Home Rockets
Safety: Before launching any rockets, safety considerations such as eye protection, maintaining a safe distance, wind direction, and the procedure for an aborted launch should be discussed. If a rocket fails to launch, it may still be highly pressurised, so the club leader should take great care when retrieving it.
The instructions for constructing a rocket powered by the chemical reaction between baking soda and vinegar are outlined on page 14 of the student booklet. Other types of rockets are similarly effective in demonstrating Newton’s third law of motion, and details of different options are included below:
- Water rocket – powered by compressed air using a floor pump.
- Straw rocket – powered by blowing into the straw.
- Plastic bottle launcher – powered by compressed air forced from the bottle.
It is worth noting that both water rockets and vinegar and bicarbonate rockets will be quite messy, so are best done outside.
Risk Assessment (Vinegar and Baking Soda Rocket)
- Club Leader - Session 5 - Rocketships Risk Assessment (PDF)
IMPORTANT: These rockets should be launched outdoors. DO NOT add the bicarbonate of soda to the vinegar until you are outside and ready to launch.
- Session 6: Stars
You may wish to watch our video 'Science Questions: What is a star?' with your students at the start of this session to introduce stars and their differences.
Constellations
Many ancient cultures around the world often created stories about the shapes and patterns the stars made in the night sky. You can think of a constellation as a giant dot-to-dot puzzle. Sailors even used them to help them navigate at night. Astronomers use constellations as a map of the night sky. When they talk about a constellation, they mean the area of the sky it is in - not just the stars in it. Astronomers divide the sky into 88 areas, each containing a constellation.
We only see the stars in these patterns from Earth. If we were looking at, say, Betelgeuse from another solar system, it and the stars around it would not form Orion the Hunter. In fact, on Earth, different groups of people created various names for the stars surrounding the star Sirius. We call it the Dog Star and the constellation Canis Major/The Hunting Dog in the UK and Ireland. In N. Korea, S. Korea and China, they call it the Wolf star; some indigenous Australians know it as the Wedge Tailed Eagle.
Some of the constellations you can see from your homes are:
- Orion the Hunter: visible in the winter in the northern hemisphere and the summer in the southern hemisphere
- The Great Bear/ Big Dipper: acts as a signpost to the North star
- Canis Major / The Hunting Dog: this constellation contains the brightest star in the night sky, Sirius
Counting Stars Activity
The instructions for this activity to estimate the number of visible stars are in the student booklet.
Using Stellarium as a Backup
If the weather or long summer days prevent you from seeing the stars at night, you can use a FREE version of planetarium software called Stellarium to achieve the same task. This handy PDF guide will take you through the indoor alternative for counting stars, although we recommend familiarising yourself with Stellarium before the session.
You can download Stellarium for free from this link.