
STEM Club support - Primary GOLD Booklet
The following information is supplementary to your booklets and will help guide you through the delivery of your STEM club. This may include short how-to guides for the different activities or additional resources you can share directly with your students or user to increase your knowledge.
![]()
Important Information
These resources are provided by The Schools' Observatory project, which is part of the Astrophysics Research Institute of Liverpool John Moores University. This video introduces The Schools' Observatory Project.
The Liverpool Telescope (LT) is the World's largest fully robotic telescope; your students will learn to use it during this STEM club. More information about the LT, including its design and science capabilities, can be found on our web page: Liverpool Telescope.
The sessions in the booklets (mostly) do not need to be done in the order presented, nor do they need to be delivered as 6 x 1-hour sessions; you can split up the sessions and activities in the best way for you and your students.
Some activities involve cutting and sticking, so scissors and glue sticks will be useful to have on hand.
![]()
- Session 1: The Solar System
You may find revisiting our introduction to the Solar System video useful before starting the first activity.
Activity 1: Solar System in Your Pocket.
Our Solar System contains the Sun, 8 planets, and many small objects, such as dwarf planets, moons, and asteroids.
Each planet travels around the Sun on a large, curved path called an orbit. Mercury has the closest orbit. After Mercury comes Venus, Earth, Mars, Jupiter, Saturn, Uranus, and finally, Neptune. Most asteroids are found in the area between Mars and Jupiter's orbits, called the asteroid belt.
Many of the images you see online don't show the vast scale of the Solar System! Complete this activity to find out how far apart each planet really is.
You can view our Things To Do page for more support running this activity.
You can print off these instructions for the club.

Activity 2: Mapping the Solar System
You can access the Grid Reference Sets for the planets on a single sheet to aid printing.
Activity 3: Planet Explorers
You can print out blank grids for your students before the session.
- Session 2: The Night Sky
You may wish to revisit our video 'Science Questions: What is a star?' with your students at the start of this session to remind them about stars and the differences between them.
Constellations: To start the session, you may also want to remind pupils about constellations. This video might be a useful introduction to constellations and the stories behind them.
Activity 1: Astro Cards
Before the session, remember to download, print, and cut out the ‘Astro Cards’ sets. You could laminate the cards so that they last multiple games. Keep each set together to prevent them from getting mixed up (to help with this, you can mark the reverse of the cards with a number or letter).
Ensure you have the arts and crafts resources you need for Activity 2 and Activity 3.
Activity 2: Pictures in the Sky
Many ancient cultures worldwide often created stories about the shapes and patterns the stars made in the night sky. You can think of a constellation as a giant dot-to-dot puzzle. Sailors even used them to help them navigate at night. Astronomers use constellations as a map of the night sky. When they talk about a constellation, they mean the area of the sky it is in - not just the stars in it. Astronomers divide the sky into 88 areas, each containing a constellation. We only see the stars in these patterns from Earth. If we were looking at Betelgeuse from another solar system, it and the stars around it would not form Orion the Hunter. In fact, on Earth, different groups of people created various names for the stars surrounding the star Sirius. We call it the Dog Star and the constellation Canis Major/The Hunting Dog in the UK and Ireland. In N. Korea, S. Korea and China, they call it the Wolf star; some indigenous Australians know it as the Wedge Tailed Eagle.
Showing some constellations:
You can display some of these constellations using the Stellarium software, FREE version of planetarium software. This handy PDF guide will take you through the software's basics, although we recommend familiarisin yourself with Stellarium before the session.
You can download Stellarium for free from this link.
Some of the constellations you can see from your homes are:
- Orion the Hunter: visible in the winter in the northern hemisphere and the summer in the southern hemisphere
- The Great Bear/ Big Dipper: acts as a signpost to the North star
- Canis Major / The Hunting Dog: this constellation contains the brightest star in the night sky, Sirius
Story Telling
It might be worthwhile exploring the mythology behind some constellations. Below are a few examples of the stories behind the patterns in the stars. These are specific to Western European cultures, but there are similar stories for alternative constellations from around the world, and you may want to explore this more.
Orion
This constellation comes from the Ancient Greek stories about Orion, the hunter. One variation of the story is that Orion was banished by Mother Earth into the sky for boasting about being able to kill every animal on Earth. In the night sky, he and his hunting dogs, Canis Major and Minor, chase the constellations representing animals (like Lepus, the hare and Taurus, the bull) but can never catch them. In the summer (in the Northern Hemisphere), the mighty Scorpion, the constellation Scorpio, chases him from the sky.
Orion sits above the celestial equator and can be seen anywhere worldwide during the course of a year. Ancient Indians recognised the constellation as a king shot by an arrow (what we call Orion's belt) and, in Arabic culture, as a giant.
Gemini
This constellation is also known as "The Twins". It represents the ancient Greek twins Castor and Pollux (the two brightest stars represent their heads). The story tells that Castor was mortal, but Pollux was immortal. The two were best friends, and when the day came that Castor passed away, the god Zeus (Pollux's father) agreed to turn Castor into a star in the sky so that he, too, would be immortal. They now live in the sky together.
Activity 3: 3D Constellations
Tips for this activity:
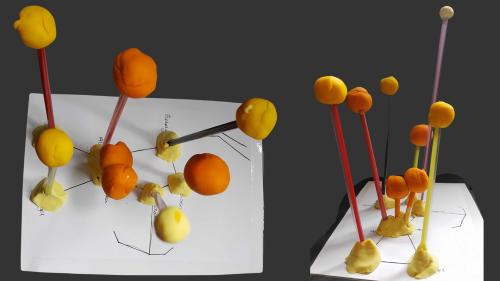
- Using straws with 'heavy' stars (such as Play-Doh) can lead to the straws falling over - they may need additional support, such as extra Play-Doh around the base.
- It will be easier to complete the activity using kebab sticks or other thin, strong sticks rather than straws, but these will be sharper and harder to cut, so you should use them carefully. If you are using these, you may want to have them cut to size in advance.
Here's an example of a 3D Orion constellation:
- Session 3: The Eggnaut Challenge
You might like to show the students videos of real rover landings for inspiration leading into this activity. These examples are both from landing real rovers on the surface of Mars:
IMPORTANT
It is important to remember that, depending on the teams' success, the activity can get messy during this session!
You may want to choose to carry out the testing outside if possible.
If not, put something down that will protect the floor and be easy to clean away afterwards, like bin bags stretched out.
Please note that the Eggnauts can often travel further than you think away from the drop point, so it's important to cover a wide area to prevent anything from getting messy.
- Session 4: Three Colour Nebulae
This session currently requires you to use our software, LTImage. This software is only compatible with Windows computers and will not work on Chromebooks, Tablets or Macs (though it is possible to use the software on a Mac through an emulator). You may have used AstroLab to this point, but currently, 3-colour imaging isn't available on this platform. LTImage can be run from a USB pen or installed on machines before the session. You can find the instructions on doing this on our web pages. Running through the activity in advance may be useful to check you are comfortable with the new software.
Nebulae:
You may want to remind students about what a nebula is at the start of the session; you could reintroduce them to our video: What is a nebula?
You can also show these pictures of nebulae to the club for inspiration, as in session 3 of the Silver-level STEM club.
Colour and Light
You may also want to speak to students about the nature of light and how the colours combine to create different colours. This can be a difficult concept for students who may be used to mixing paint colours to create new colours. These colour combinations do not apply in the same way to light. When we combine all the colours of light, we create white light. The primary colours of light are red, green, and blue. You can read a summary of light and colours on our learn pages.
We also have a presentation available that may help you understand and disseminate the concept.
You may want to introduce students to this quick tool for combining light colours to show how light combines to create more colours.
Activity
You should be able to follow the written instructions to create your 3-colour images, but if you prefer to see a demonstration, then we have a walkthrough video available:
You can also access some example image files and teacher notes on the 3-colour imaging resource page.
To extend this activity further, you may want to encourage students to request their own 3-colour images from Go Observing. You can do this by following these instructions:
- Head to Go Observing
- Click on either Galaxies or Stars
- Click on the respective 3 Colour option
- Click on the object you'd like to observe
- Click Submit Observations to send these to the telescope!
- Session 5: Space Careers
You can explore some of our Career Heroes with your students during or after the session. You can also find much more information on the careers area of our website.
Activity 1: Space for Everyone
You may find our PowerPoint presentation useful for carrying out the activity.
Activity 2: Space Skills
You may want to play the myths vs. realities video with your students about the skills required to work in the space industry.
- Session 6: Star Party
Time to celebrate!
Below, we've listed some ideas to help your star party but feel free to do what works for your club. Congratulations on completing 18 weeks of STEM club activities all about space.
Train like an Astronaut:
The European Space Agency has some lovely resources called Mission X: Train like an astronaut, which can get the students moving and work as games for a fun party session. Some which might work well are:
For less aerobic exercise, why not join us for cosmic yoga or a walk through the Solar System?
Another astronaut challenge:
Ask students to wear thick coats and big gloves to mimic wearing a space suit. Then, ask the children to carry out tasks that require fine motor skills, such as stacking blocks, holding a pencil, using scissors or Play-Doh, or pulling up a zip or fastening.
Music ideas (please use your own caution here to ensure you are happy with the selection being played):
- Space Oddity - David Bowie or check out the version from astronaut Chris Hadfield's version from the International Space Station!
- Drops of Jupiter - Train
- Fly Me to the Moon - Frank Sinatra
- Starlight - Muse
- Starman - David Bowie
- Reach for the Stars (Mars Edition) - Will.i.am - please be careful as there are explicit versions of this song
- Man on the Moon - R.E.M.
- Walking on the Moon - The Police
- The Planet Suite - Gustav Holst
- Rocket Man - Elton John
- Supersonic Rocket Ship - The Kinks
- Across the Universe - Fiona Apple
- Intergalactic - Beastie Boys
- Out of Space - The Progidy
- Sky Full of Stars - Coldplay
- Counting Stars - OneRepublic
- Lucky Star - Madonna
Food ideas:
- Create a tasty constellation
- Why not buy some freeze-dried food like the astronauts eat? You can usually find things like freeze-dried yoghurt drops, ice cream and dried fruit
- You could make cookies or pizzas in space shapes using cookie cutters.
- Astronauts eat lots of wraps/tortillas instead of sandwiches as they produce fewer crumbs - why not do the same?
- You could make fruit space rockets using chopped fruit on kebab sticks. Strawberries make good nose cones for the top.
- You can use cookie cutters to shape cheese into stars and pair it with crackers
- What about popcorn for asteroids?
Videos:
- We love this Dwarf Planet Song. The channel creators also have lots of other space-themed songs with videos available on YouTube
There are lots of interesting videos from astronauts on the ISS:
- Pizza night on the Space Station
- Space food
- Washing your hair in space
- Brushing your teeth in space
- Exercising in space
- Tennis in space
- Using the toilet in space
- Getting ill in space
- Sleeping in space
Showcasing:
You may want to invite parents and carers to this final session and use it as an opportunity to display your club's work. How about:
- Print out some of the student's observations and 3-colour images
- Having the students' workbooks from throughout the 3 levels of the club on display
- Display the sky for the day of your party on Stellarium and discuss what can be seen. You could combine this with making your own Star Wheels, which help you recognise constellations all year round.
- Students could create posters of some of their favourite space objects in advance to display.
- Students could draft a sentence or two about their favourite thing they learned or how they felt about attending the club.