
Now that you know how to spot an asteroid, the next step is opening and analysing images in AstroLab for yourself!
We recommend practicing with some example data of asteroid 138205 (2000 EZ148). You can check whether you've found the asteroid by looking at the videos under Example Data: Answers at the bottom of this webpage.
Instructions:
- 1. Get the Data
Download the example data of asteroid 138205 (2000 EZ148).
This data is contained in a single file but includes multiple observations. To access them later, you may need to unzip or unpack the zip file onto your machine, where it will instead create a folder with all of the files inside it.
- 2. Open and Scale in AstroLab
Go to AstroLab and open the first 3 images (numbered 000, 001, and 002 at the end) in the data set. Make sure these are loaded in the correct order.
Use Display > Scaling to adjust the minimum and maximum values until all images are viewable. See the video below for more information on how to do this.
- 3. "Blink" through the Images
To quickly flick between images when you have several open you can either use the arrow keys at the bottom of the image boxes, or use the shortcut.
To use the shortcut, press the "CONTROL" button on your keyboard and the number "2" to quickly skip forward an image. Use "CONTROL" and the number "1" to skip back. If you hold down these buttons, it will quickly move through all the images you have open and then circle around again.
Tip: It can sometimes be difficult to spot the asteroid in the portion of sky imaged by the telescope. You may want to start with the images zoomed in, "blink" through them, and then zoom out if you can't see anything. Start at 2x zoom (Click Display > Zoom in and repeat this twice on each image), then 1x zoom (Click Display > Zoom out on each image), and then look at the full frame (Click Display > Zoom out on each image).
- 4. Repeat for the Long-Interval Data Set
Repeat the steps above for the long-interval data (these are the last 3 images in the data set - numbered 003, 004, and 005 at the end).
You do not need to open a new window for these observations; you may find it easier to load them into the same version of AstroLab you have the original images in.
- 5. Record the Position
If you've spotted an asteroid in any of the images, you can measure its position. Zoom in on the asteroid and simply hover your cursor over it.
Try to get as close to the centre of the asteroid as possible. Use the zoomed in view (circled in orange in the picture below) to help with this. The small blue square in this box shows where the cursor currently is.
Image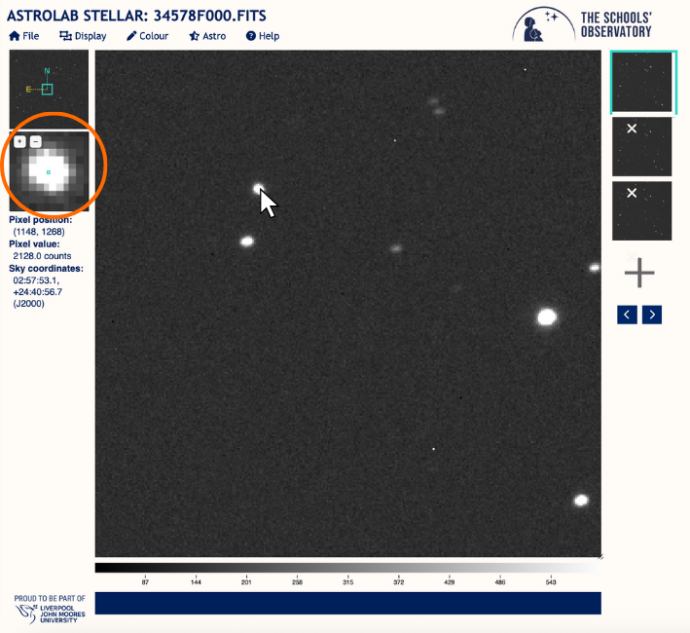 CreditThis work by The Schools' Observatory is licensed under All rights reserved
Once you are hovering over the asteroid, the position values are shown to the left of the image (underneath the zoomed in view). The Pixel Position is given as well as the Sky Coordinates.
The sky coordinates, known as Right Ascension and Declination, enable us to pinpoint the location in the entire sky, rather than just within our image.
Record these values, along with the image ID (e.g. 34578F000), in the position table document.
Note: For the Sky Coordinates, you must include the "+" or "-" that is displayed with the second value.
- 6. Request an Observation of a NEO and Repeat the Process
You can now request your own NEO observations through Go Observing, download the data you receive, and have a go at spotting the asteroid in your own data.
Use the link above, or go to Go Observing > Investigations > Near-Earth Object Hunt. (Note: only student accounts that are KS3 and above will be able to access the observing program through this "Investigations" route).
- Example Data: Answers
- Video fileCreditThis work by The Schools' Observatory is licensed under All rights reserved
Short-Interval Data Video fileCreditThis work by The Schools' Observatory is licensed under All rights reservedLong-Interval data The position of the asteroid for each image can be found in the table below.
Please note that your values may differ very slightly depending on where you placed your cursor on the asteroid. You should try to get as close to the centre as possible.
Image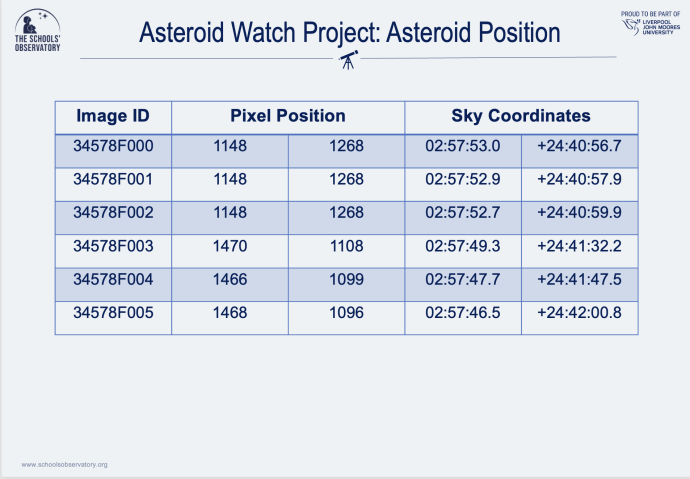 CreditThis work by The Schools' Observatory is licensed under All rights reserved